Showing posts with label Crafts. Show all posts

August 14, 2012

Time to Get My Holiday Planning On

The Holidays have arrived...well they have in my house. Actually to be perfectly honest with all of you the Holidays never really leave our house! I just keep them locked up in my scrapbook room where no one is allowed to make fun of me! You all know by now that I'm a holiday nut so I'm sure none of you are surprised with my newest Pinterest Project!


2012 Holiday Planner

And I'm not the only one! Check out my super cool friend Alycia's Holiday Planner!!

The original blogger actually provides you with printable templates but because we are total slackers and we don't have a printer I got to use all my creative juices and make it uniquely mine!

First things first, get out any and all Christmas embellishments you might want to use! I'm not ashamed to admit I spent 20 minutes going through all my Christmas supplies looking for just the right paper, ribbon and stickers!


Then get out all the supplies you will need to complete this project:
  • Composition Notebook
  • 2 - 6" x 9" Envelopes with Clasps
  • 36" Piece of Ribbon
  • Labels (or the printouts)
  • Scissors
  • Adhesive
  • Adhesive Pen Holder (I added this bit cause every planner needs it's own pen)


The first step - glue your ribbon to your composition notebook. Yes this is the very first step! The ribbon is "technically" for prying eyes but since Chuckles and I don't have kids yet I decided it was just a pretty embellishment to have! I used hot glue to get my ribbon on the notebook, and you will want to glue it on both sides, make sure when gluing you have even lengths of ribbon left to tie.


Then take your patterned or colored paper (12 x 12) and cut in half. Then take each half and trace the front and back covers. Your piece of paper will not fit your entire cover, do not worry it's supposed to work like that, but you will want to make sure you trace the length and the corners on the covers.


Then cut 2" strips off your other 12 x 12 paper.


And then line these up close to the black binding on the notebook and cut to the appropriate length. You want it to match the length of the notebook.


And for all of you not behind the times go ahead and ink the edges of your paper. I am still "new" to the inking game but can I say how addicted I am already! Just for the rest of this post assume I inked the edges on every single piece of paper possible!!


The next step requires you to have a 5 1/2 inch circle punch with I did not and probably will not ever own! But I do own my lovely Cricut so I went in search of a circle. Instead I found an ornament, super cute right? LOVE IT!


Now we get down to the nitty gritty. With all your paper cut it is now time to glue everything down! YAY!!

You will first glue down the bigger piece of paper, lining it up with the edge of the notebook, then glue your circle (or whatever shape you'd like) on top of that. You will want to line the edge of that against the black binding, not the edge of the notebook.


Then glue down your 2" strip of paper.


Next up she calls for your attach your cut out tag but I chose to do a different embellishment. Again the whole no printer and I did notice that her most current version has 2011 date and not 2012.

I ended up having a thicker card stock circle and that cute Holiday Cheer embellishment. It needed a little break in color so I cut out (using the Cricut) a circle in green! However you chose to do it, at this point go ahead and finish up your front cover by attaching that. Then of course glue down your papers for the back cover.


After your front and back covers are decorated it's time to create your envelope holders and tabs. I grabbed a package of Martha Stewart tabs in red to use and they worked out fabulously!!


One of the first things you will notice is that ugly black writing all over the front and back covers. Easy solution to cover those up....


Cut out a piece of plain white card stock and glue down! (Quick little side note cause I screwed this up, if you are planning on attaching a pen holder to it you will want to do this now. I was able to peel back the white card stock and slide it at the very end but if you can avoid doing that then you must)


Next you create your two envelopes for receipts and coupons. I just cut out two strips of each patterned paper, glued to the bottom, added a strip of green so that I could write on there and have it be visible.


Then attach those envelopes to your covers. I chose to use hot glue to attach mine.


Creating the tabs is really easy! Lucky for me the Martha Stewart ones worked out well. First I wrote on them then I spaced them out throughout the notebook. Make sure to work your way down and leaven enough pages in between each section!


Ta Da!! Sections are attached, book is looking almost complete!!


Once I had the tabs added it was just a matter of adding little things here and there. First I needed to write coupons (or receipts) onto my envelopes, then I decided a little color on the opening page would be super nice! Also any excuse to use my new last name I'll take!
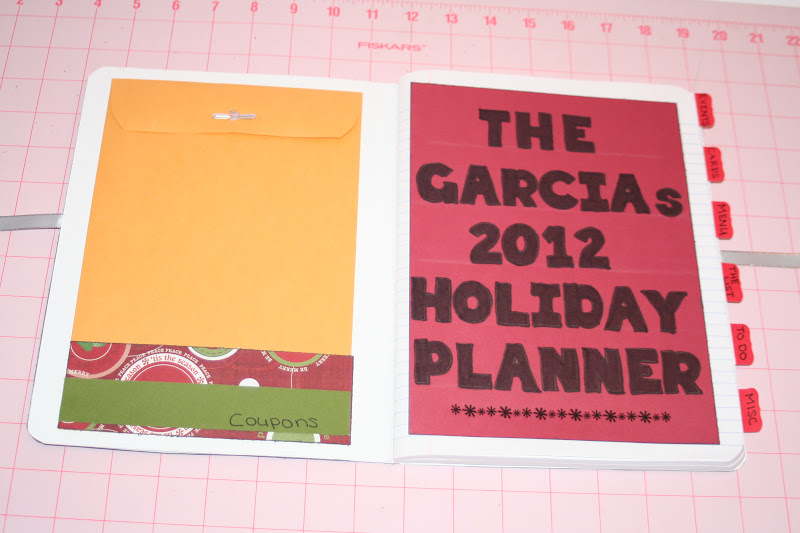

Awww look at how cute it is!


Not quite complete though. Like I mentioned I completely forgot to add my pen holder until the end, but I was able to peel back the white card stock and attach it. This seriously was a HUGE addition for me!!


Now it is complete!!


There are a few other steps, such as printing out and adding calendar pages for you "Events" section, which I will get printed out and added. We have actually decided we need a printer and am now doing research.

This project was sooooo much fun!! I had an absolute blast working on it!! It was such a great afternoon project! Huge thanks to the eighteen25 blog for sharing such an adorable and helpful project!!

August 8, 2012

DIY Car Garbage Sack!

This past weekend I got to spend a lot of quality time being crafty in my scrapbook room! While that was not the original plan for the weekend I was extremely excited to get in there and have some fun! And thanks to Pinterest I was able to pull off a project to do within 5 minutes!

I had found this awesome little Travel Trash Bag on Pinterest and knew immediately it would help keep my car cleaner longer! Am I messy person? No, but during the summer months we take my car everywhere and it ends up pretty darn dirty! I recently cleaned it and am now being super anal about no food, no scraps of paper, no drinks come in that do not leave within the same trip...yeah it's pretty bad but she just looks so pretty!!

Enter this amazing little project that will only aid my attempts at keeping my car spic and span!!

Hello Super Cute Travel Trash Bag

I will give you the brief commentary on how to complete this project, accompanied by a million pictures, but I would highly recommend you check out the originators blog post about how to complete this trash bag!

Thanks Nancy's Couture for a fun and easy project!

Thankfully I had all the supplies to work on this project cause this woman was not leaving her house unless absolutely necessary!

You will need:
  • 1/2 yard of fabric
  • Interfacing
  • Boning
  • Scissors
  • Velcro
  • Thread
  • Sewing Maching

I actually had purchased a bunch of this fabric a couple years ago in hopes of making my own grocery tote bags, nope they still haven't been made, but I do have them on my ever growing To Do list!

I started out by ironing out my fabric to make it easier for cutting.


You will need to cut a rectangle of fabric measuring 20" x 15", 2 fabric rectangles measuring 2" x 11", and 2 pieces of interfacing measuring 2" x 11".


Once those are cut out you will want to attach your interfacing to the wrong side of your fabric rectangle strips. Read the directions on how to attach your interfacing. Mine was easy, you just use an iron, but what this crafter didn't realize when I originally purchased the interfacing is that it was double sided adhesive. To sum up I had to be very carefully when attaching my interfacing so it only stuck to one side of fabric and not my ironing board as well.

It worked out well!

Next up you will fold each on of those rectangles in half using the "hot dog" method :) And pin in place!


Then get to sewing the open ends up, but do leave one end open (either top or bottom).


And voila, you have yourself a set of straps!


The next step calls for you to start working on the actual bag. Take your bigger rectangular piece of fabric and fold it in half, with the wrong side of the fabric facing out.


Sew the open ends shut.


This part got a little tricky for me and I ended up opening up her blog on my lap top! For some reason I was just nervous this part wasn't going to work right and I had a hard time. I also "altered" one part of her directions, basically because I was confused.

She has you to do two folds, first you fold the top over 1/4" and iron, then fold another 3/4" and iron again. I ended up just folding it over 1" and then ironing. After you are all done ironing you slide the unsewn part of your straps underneath your fold and pin. Then sew the top part, leaving enough "empty space" for to insert your boning. Important do not sew all the way, I left an inch opening in the fabric to insert my boning.


See how an inexperienced sewer may have gotten slightly confused? I'm sure it's just me that's confused and nothing to do with the original bloggers instructions but I still was slightly stumped!

After you've sewn the top part (leaving an inch unsewn) you can insert in your boning. Cut a 15" piece of boning.

The boning I got (and maybe it's all boning I'm not sure) had a cloth covering so I removed that and then just inserted the hard part of the boning into my bag.


Once your boning is in (you want the two ends of the boning to end at each strap) go ahead and sew up that 1" piece you left open.


The next part is another alteration (pun intended) I made to the original instructions. My straps were kind of funky when I flipped the bag right side out. It just looked a little funny to me so I  ended up sewing them in place. This is going to be hard to describe so bare with me - I "folded" the straps over so that I could get an idea of how it was going to sit in my car and then seemed to be a little "unsteady". I just added an extra set of stitching to help hold them in the place I wanted them to be. I know totally confusing, I am sorry about that, but you can probably skip this alteration altogether!


Next up you attach your velcro to your straps! I had iron on velcro (Yippee) so this was done within 5 minutes for! For those of you who don't have iron on velcro you can either A. Just sew on your velcro or B. Go get iron on velcro! I love it! Make sure to put the pieces on the correct side of each strap so the two connect perfectly!


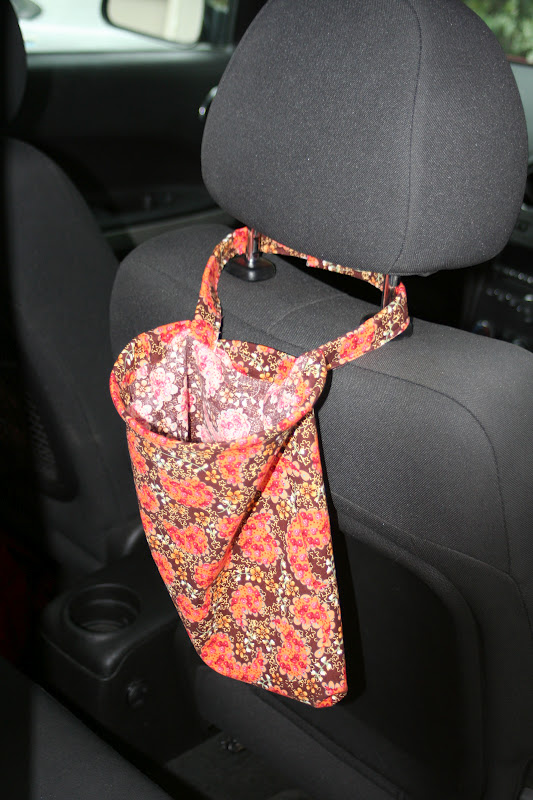
And that's it folks!! Your travel trash bag is complete and ready to be hung in your car!

Oh yes you better believe that within 10 minutes of finishing this project I was headed out to my car and ready to even start using it! Alas, I had no garbage to put in it but it still looks AWESOME!!

I am so stoked with this project and so pleased with the ease I had in putting it together. Sure I had a few moments where I struggled but nothing that wasn't easy to manage! It was such a fun project to make and I am sooooo happy I found it on Pinterest!!

So thanks again to Nancy's Couture for their awesome project ending up on Pinterest!! It provided me with a great afternoon!!

July 14, 2012

DIY Rotating Goal List - Fabulous!

 I am loving all the Pinterest projects I've been completing lately! This one just happened to be one of my very first pins ever! A rotating goal board!! I immediately decided I needed it for my scrapbook room, now months later it's come to life!

Ta Da!

 
You don't really need that many supplies and in fact most of the supplies I started out with reminded me of grade school projects. I got 3 different color posterboard, 2 different pinks to match my room, and a white one just in case, Crayola markers, more cardstock, index cards (the original project calls for post it notes but I didn't have any handy and I had a bunch of leftover index cards from my Sisters bridal shower), scissors (or paper trimmer), and glue. Plus any additional embellishments you might want to add!


The first thing I did was cut out my posterboard to match the size I wanted. You can make it as big or as small as you would like. I decided to go with the pinks and left half an inch spacing around the sides.

Next up I used some leftovers from the wall sign I made for our wedding photo wall (that post will be coming I promise) and  then I grabbed these sparkly pink letters that I've had for years and have been "saving" for the perfect project! I think it's absolutely ridiculous that I "save" certain embellishments for projects in the future that I don't even have figured out yet. Ridiculous but I still do it! :)


After getting the title all situated I started to size down the index cards. I knew I wanted to keep one at its regular size for the month, but then I wanted the actual goal papers to be slightly smaller so I  cut them into 4inch by 4 inch squares.


Then I got out my stencils that I loooooovvveeee so much! Seriously I freakin love stencils they are so fun! And made the July sign! Yup that's where the crayola markers come to life!


Then I started to assemble and glue down all the pieces to my puzzle!


Next up was creating my goals! This actually was harder than I thought. I wanted to do goals that I knew I had a realistic shot at achieving and I wanted them to be "fun" and related to creativity.


After that I made an "extras" folder to hang on the back. That's right the original project did not include this but I didn't want the extra index cards floating around where I'm sure they'd end up lost, then I'd buy new index cards and poof they'd magically appear!!

Instead, I avoided that mess, and took a plain white envelope, cut off the top fold and..........


Voila...secured it down with hot glue and placed all my extra index cards inside!


I added a few more embellishments (see the pretty sparkly flowers!!) and finished tacking all the pieces with glue!! Called Chuckles into the scrapbook room and we got the hanging it!! I secured it to the wall using two small nails.

 I must say I LOVE LOVE LOVE this project!! It was so fun, so easy, and a great way for me to stay on top of my monthly goals!! I love having goals, it just keeps me from getting lazy and sitting on my butt every night in front of the TV. Seriously I'd be a total couch potato without my hobbies and I'd hate every minute of it!!

So for the month of July I want to:

1. Complete 4 Pinterest Projects
2. Try 4 New Recipes
3. Do 10 Blog Entries (I believe this is already checked off)
4. Scrap 4 Layouts
5. Make 2 Cards (this is a new goal for me, I'm so not the card maker but I do enjoy creating cards)
6. Complete 1 Sewing Project!

Has anyone else seen this project on Pinterest and actually made it?? I would love to see your creation!

Oh and here's the fabulous source of this fun project. Check it out here.
 

A Bit Of This, A Dash Of That Template by Ipietoon Cute Blog Design and Bukit Gambang