July 12, 2012

Photography Challenge - Day 12 - From a Distance

Another day another photo!! Today's photo challenge was easy the minute I pulled onto the street where my office is...do you remember this post? If you do then you remember I love this barn that sits outside (and down the street) from where I work. It's beautiful and the view behind it is usually a good one! You can see a chunk of the city I live in and just everything around this barn is beautiful! I really am lucky to live where we live, cause it's beautiful and prices can definitely show that! Thank goodness we were able to get a condo when we did!


Any who - it was a beautiful morning here and the scene was just perfectly set up! I pulled off to side of the road and snapped the above picture for my From a Distance challenge! It's not a super far distance, but still a distance shot! Check out those blue skies!! I really love this photo and again I am super impressed with my phone camera!! I know I'm getting to a couple challenges where I'll break out my fancy camera but my phone has done me proud for these challenges so far!!

What to do With All Those Wedding Cards??!?!?!

Ok, I am officially loving all the Pinterest projects I've been completing lately! It's been so fun to not only try new crafts, but to even be spending so much time in my scrapbook room!! So amazing!! LOVING it!!

This project was super fun!! It originated here. :)

I ended up using a whole bunch of my crafting tools but these were some of the essentials - wedding cards (& bridal shower cards), some new flower embellishments I found, 2 albums with rings - had to buy the whole album package in order to get the rings (anyone know where I can order just the rings like these?), ribbon, and a hole punch!

You will also need some cardstock and maybe more embellishments, perhaps a picture too!


First things first you want to take your biggest card (longest and widest) and add 1/2 inch to each of those lengths. Then cut out those dimensions onto a piece of cardboard. I tried using this thicker big poster board = bad idea!! Don't do it!


I ended up using some random thinner cardboard I had lying around.


Once you've got those cut out, you get to start decorating them with your choice. If you clicked on the link above and you look at my picture below you can see I went a totally different direction on the look of my album! I of course wanted to incorporate our wedding colors and I had some super cute wedding paper to use!!


Once you get done decorating both the front cover and the back cover you will glue those down to your cardboard pieces, unless you've already done that then grab your ribbon!! It's hard to tell on how much ribbon you will need.

The original poster said 30inches but that was barely enough for ours. If you have a bunch of cards from your wedding then give yourself extra ribbon!!

Lay your ribbon across your back cover. Take a push pin and an eraser type object. Something the push pin will sink into without much force. Make a hole using the push pin that goes through your ribbon, cardstock, and cardboard.


Then take a decent size brad (you can tell I used regular size ones, big giant ones not needed) and push it through that hole, through the ribbon, cardstock, and cardboard. Do this through both sides of your back cover. Remember to leave equal amounts of excess ribbon on both sides, it's what is going to tie the album together.


Once you've got your brads on there you will want to cover them up on the opposite side. I took leftover cardstock from the front and back cover and just cut out another 2 pieces of cardstock and glued those on the opposite sides of both the front and back cover.


Next up you will want to figure out where your holes need to be for your rings. I took my medium cards and measure out by them. Oh and the orginal blogger chose to do one ring but I wanted two, I like things even, yes it's kind of weird :)

Anywho I use my hole puncher to cut two holes in my covers.


Then, one by one, I took each card & ligned it up with the holes on the front cover. Took a colored marker and made dots where the hole would need to be cut. After you've marked every card on where the holes need to be you then need to take your hole punch and create all those holes!! This can be time consuming but if you are like me you were enjoying a sweet Disney film while crafting today. Let's hear it for the Little Mermaid!! :)


Once you have punched all the holes you will then need to start putting all those cards onto the two rings. Make sure your rings are big enough cause if it's thick you will need BIG rings, if you have a lot of thinner cards you can probably get away with normal sized rings. Make sure you put your front cover on first and back cover last!!


TA DA!! How stinkin cute is this?? I am so extremely excited that I came across this card album idea cause I don't ever want to get rid of our wedding cards but as I'm sure most of you know it can be a challenge to store cards. This is a nice little package of cards that can also be on display if you choose to go that route.


And you can tie the ribbon into a simple bow, which makes it easy to open and retie the album after you're done browsing the cards. I love having two rings instead of just one by the way. It's more like a traditional album which I love.


This album was so fun and so easy to make that I was able to do my bridal shower cards as well!!

These albums are so cute and so fun!! If you've got your wedding cards, birthday cards, christmas cards, whatever cards you should totally make one of these albums!! You could even do it for your kids as they grow older since they probably won't remember any of the cards they get from when they are little...just a thought!! I love the idea of doing your wedding cards!

Another great Pinterest Craft idea that has now come to life!! Yay!! I am seriously loving all of these fun crafts!!

BTW if you are at all interested in following my Pinterest you can find me here. And don't forget to check out where I found this idea - Something Turquoise

July 11, 2012

Photography Challenge - Day 11 - Black and White

I really wasn't sure today which challenge I was going to be doing. I am still waiting on those clouds...instead I chose a black and white! This one was actually easy cause I could pick anything and make it black and white!

So what did I pick?

My Roxy of course!!

Originally I wanted to get Jasmine but she wouldn't sit still long enough for a photo so instead I went with our other dark furred animal...little Miss Roxy!

She is so darn cute! I just love taking pictures of all our animals cause they are like my kids! And black and whites usually turn out awesome when they are of Jasmine and Roxy, I think it's cause Roxy is black with grey sprinkled in and Jasmine is completely grey!

Just a quick post tonight since there is only so much I can say about Roxy...okay maybe it's that I still want you to come back and read my blog and I am sure you all don't want to hear me go on and on about my perfect little princess!!

I hope you all are having a wonderful evening!! We are in the downhill slide to the end of the week!

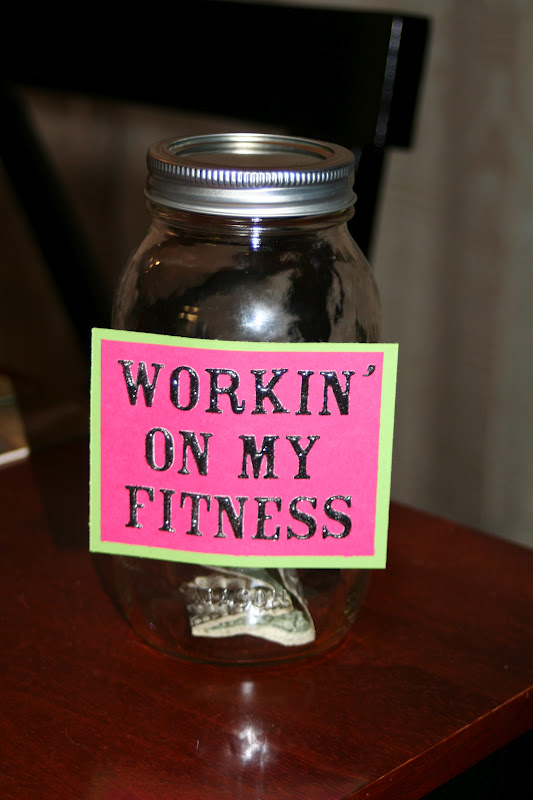
Pinterest Idea - Workout Jar!

The other day I came across an awesome workout reward jar on Pinterest. This Pin took me here.

So I made this...


I absolutely love the idea of a workout jar!! The way it works is you pay yourself $1 for each workout you do! How motivating is that?? Super motivating for me cause the more I workout the more money that will go towards my new wardrobe once I hit my goal weight!! YAY!!

Luckily I had everything on hand to make this project! Score for not having to run to the craft store!!

You just need a jar, any jar I'm sure, but I used a regular ol' Mason jar! And then grab some cardstock, letter stickers, ribbon, and a hot glue gun.


The first thing I did was create my "Workin' On My Fitness" sign/label. I am sure there are plenty of other sayings you can put on your jar if you want but I really liked the original idea, however if you need an idea Chuckles wants it to be "Working My Ass Off" :) I stuck with the other!!


And TA DA!! I wrapped my black ribbon around the middle of the jar and secured it with hot glue. Then I attached my sign/label on with hot glue.


And since I really wanted to add a little something else that might serve as motivation or a reminder of how far I've come I had this cute embellishment. For some reason that one word, Soar, really seems to be inspirational to me.


And now along with my new workout calendar (will be shared soon, stay tuned...) that I made cause I'm bumping up my workouts for the month of July the workout jar sits right above on the top of the fridge!! It will be a nice daily reminder of how far I've come with my health and fitness...


Now I just need to go get a bunch of $1 cause I already owe myself $7 for this week alone for all the different workouts I've done so far!! I am super excited to start this and to really keep me motivated I added in a slight twist!! I might skip a workout one day but if I'm skipping a workout shouldn't I get punishment? I'm not talking about those days when you are sick and SHOULDN'T be excercising but if I'm skipping a workout to be lazy than I should have to pay up...

For every workout that's on the calendar that I don't do I lose $1!! Isn't that awesome. Losing out on new clothes money is so not worth it...I'd much rather go work out and gain a $1!!

So stoked I saw this idea on Pinterest!! It's brilliant and I am so excited to start raking in the moola!!

July 10, 2012

Photography Challenge - Day 10 - Low Angle

 Today's challenge is a shot from a low angle. Now this could go a few different ways. I chose to do my own spin on it. 

If you ever come to my house you will 99% of the time see a candle burning! I love candles! No seriously I love candles!! I have an entire shelf in our downstairs bathroom dedicated to candles that is overflowing, okay so maybe it's two shelves. I also have a tub in my scrapbook room full of candles specifically for that room. I've got candles on every bathroom counter, our bedroom, living room (tv stand AND mantal), dining room, and our entryway! 

Yes it's an obsession, but they are so pretty and they always smell soooooo good!! Even in summer I burn candles! In fact I'm burning these right now!


 So pretty right!! I love those vases as they are the vases I used for the girls bouquets at our wedding. I like being able to display items from our wedding and these are perfect on our cookbook shelf in the dining room.

But back to the photography challenge!

With it needing to be a low angle shot I was racking my brain thinking of an shot. At first I thought how perfect I'll lay out on the grass and capture a beautiful tree with our gorgeous blue skies, but that seems so generic. Not that it makes it less gorgeous but I really wanted to step out and do more "unique" shots. 

So candles it is...with their pretty light reflection and warm glow...it makes my heart happy just looking at the picture.

Any one else love candles as much as me?

Hot Overnight Oats!

My Sister LOVES her oatmeal and it just happens to be a different version of Overnight Oats than the previous post! She does warmed overnight oats in a crock pot! Super easy and you literally wake up to ready made oatmeal, grab and go!

You will need Steel Cut Oats for this recipe, milk (I used 2% Lucerne Milk), Cinnamon, and Water.


Throw all your ingredients into your crock pot - 1-1/2 cup oats, 3/4 milk, 5-6 cups water, and however much cinnamon you would like!
Turn the crock pot onto WARM and put the lid on top! Then head for bed!


In the morning you will see this....it really doesn't look appetizing but give it a stir and add some more cinnamon if you are like me.


With this recipe you get 1 whole cup of this oatmeal and it's only 4 points!! Very nice on the points!! And you can either take a bite of it right from the crock pot or if you like it hotter just heat it up more in the microwave. This breakfast is pretty much ready to go the minute you get out of bed!!


I was super excited to dig in and see how good these oats were.....and then....I did.

I am actually not a big fan of this style of Overnight Oats. I think overall the problem I have is that I never knew how much I liked cold overnight oats and am just not a fan of any style oats warmed up!!

So for now I'm going to stick with my Cold Overnight Oats, in fact I'm trying them with Honey Greek Yogurt this time...but I do think any one who likes warmed oatmeal should give these a shot!! They are super easy and you end up with 7 servings from one batch!! Set for a week!!

July 9, 2012

Photography Challenge - Day 9 - A Bad Habit

Today's photo challenge is of a Bad Habit!! You'd think this would be easy but it wasn't. Not because I don't have many bad habits but because I had to pick one out of my many! I easily could've picked biting my nails, eating food in bed, not washing my face every night before bed, and the list goes on...

Instead I chose one that I knew I could tackle tonight....I stock pile magazines like crazy!!

I picked up 6 that I got within the last month and then pulled out my magazine basket which is overflowing. I don't even think I could fit one more into that basket.


I don't go out and buy a lot of magazines, on occasion I'll pick up a trash magazine or a new fitness magazine that I haven't seen but overall my magazines come from subscriptions! Lots of subscriptions!! Currently I get Weight Watchers, Cosmo, Family Circle, Good Housekeeping, Better Homes & Garden, Shape, Fitness, Women's Health, Cooking Light, Simple & Delicious, Healthy Cooking, Taste of Home and the online version of Runner's World.

Yeah I'm a magazine addict. I can't help it. I love absorbing as many factoids as possible and I swear I'm like a sponge when it comes to news and advice. I love advice books, advice columns, product reviews, new recipes, recipe make overs, interviews with celebrities, fitness tips, and of course beauty tips!! I'll never give up this bad habit!!

Anyone else out there a magazine addict like me?

New Harness....Quick Fix!

When I first started thinking about taking Buster with me on my runs I knew I needed to start walking him first and building him up to running. But I needed a good harness because this dog pulls like crazy!

It’s our own fault for not taking him on walks from when he was a puppy but when we lived at our apartment we took him out nightly to the tennis courts and ran him there. No excuse for being a lazy bum since then but now I'm all over it!

I hit up our local Petco and got this harness, but after our second long walk I noticed it was rubbing a raw, sore sport under his arm. Cause they put the buckle on the harness in a really dump spot. I mean couldn’t them make it clasp underneath his chest or on top of his back, nope it goes right under his arm so it rubs the whole time.

I felt like such a horrible dog Mom that I went out the next day and bought some soft fabric and some velcro to create a “protective sleeve” to put over the buckle!

I ended up finding a piece of blue (for boy) softish fabric and picked up the iron on velcro to save some time. I figured if the iron on velcro didn’t work I’d go back and get the sew on kind.


First thing I did was cut a piece of fabric that ran a decent length on the harness. I ended up cutting two cause the first one wasn’t big enough to wrap around securely.


Then I attached the first part of the velcros. They are sticky so they go on but then you have to iron them on.


One thing I almost screwed up was not putting the opposite side of the velcro on the correct side of the fabric. It must go on the opposite side since it’s wrapping around the harness.


Since I was worried they might come loose from the fabric, I’m not sure why but I was, I did two passes on ironing it out. I wanted to make sure it would really stick since I knew I’d been taking it on and off a lot.


The first go around I only attached two pieces of velcro thinking that’d be enough. But when I wrapped it around the harness the middle part stuck up a bit and it felt like it was going to slide around.


So I attached a third piece of velcro to the middle.


Second attempt….


And it worked beautifully!! It was a lot more snug so I think that third piece was a must!


Then it was time to attach it to Buster. I had to put the harness on first and since he gets so excited for his walks I wasn’t sure how easy it’d be to wrap around the small piece of fabric. Surprisingly it was super easy! I like to think he understood that A. It would help prevent the pain or B. He knew we weren’t going anywhere until he sat like a good boy!!


See he even sat for a photo, which is extremely hard for him! All of our animals are camera shy and I usually take about 20 pictures before one turns out good!! Not this time, this little boy was ready for the photo shoot to be over and for us to get out the door!!


And that’s exactly what we did. I put on my headphones, turned on my audio book and we headed out into the sunny day!! We didn’t even try and get Buster to take a good picture, he was ready to go!!


We ended up doing 4.62 miles and I thought for sure the protective sleeve worked like a charm. And while I am sure it did (with lots of reassurance from Chuckles) protect him from making his sore worse it did irritate it. The sore he developed last week was still there and I think anything rubbing on it would irritate it so I’m giving Buster some time off this week and once it’s all healed we will give it another shot!!

Fingers crossed this works so that Buster Roo can continue to be my workout buddy and look like this at night :)


A Tired Dog is a Happy Dog!!!

A Camping We Went!

As you all know we took a mini camping trip over the weekend!! Even though the camping trip got cut short and we came home Saturday afternoon I still managed to take plenty of pictures to share!!

We had a great campsite this time. it was pretty cozy and was the perfect size for the 7 of us (yes I count our dogs). Since I packed the car and ended up hurting my back I let Chuckles handle most of the unpacking and all of the setting up at camp. I never help with the tent so that wasn't a big change, he just seems to work better on his own :)


After we were all set up and ready to relax Justin built us an awesome campfire. It wasn't really cold or anything like that, heck I spent the whole night in shorts, but we figured why not, it was after 8 and the sun was going to be going down soon!!


After a very crappy night of no sleep on Friday we decided to go home Saturday in the late afternoon. But we decided to do as much as possible to enjoy our camping trip on Saturday. While Chuckles, Angelina, Justin, and Bianca went to play mini golf I hung out at the campsite with the dogs.


Buster keeping watch!
While they were all sweating it out in the hot weather and hitting up the mini golf course I indulged in some leg tanning and magazine reading. It was heaven


Roxy took advantage of the peace & quiet and slept!


After they returned sweaty, hot and tired from mini golf Angelina and I took Bianca up to the pool! It was about 98 degrees so cooling off in the pool was exactly what we needed!! It was so refreshing and we even got to lay out for awhile and tan before the bee's started to take over the pool area. Me = not a fan of bees.

Can you find the photobomb?
We are so lucky to have a great campground that's only 40 minutes from the house. You get forestry while at the campground and then you get to see all of this on the way home...We definitely live in a beautiful area!!


And of course as soon as we got home, got the car unpacked it was shower time!! We always keep the dogs outside until we are ready to go inside and throw them in the shower!!

Look at how stinkin cute Roxy is after a bath?? She gets so fluffy!!


After showering it was time to relax!! We decided to keep the remainder of the day really chill! I caught up on blogs, Pinterest, and email while Chuckles watched TV. Then we hit the sack at probably 8:30. Overall it was an interesting weekend and definitely not our best camping trip but that's okay. My back was so thankful to sleep in the comforts of our own bed!!

July 8, 2012

Photography Challenge - Day 8 - Something Blue

Today's photo challenge was to take a picture of Something Blue and it was quite an easy challenge!! I recently decided to start taking Buster out for walks on Sundays and my "Off" days from Running. In order to do this I absolutely had to get him a new harness because he's a puller. Since he's Border Collie x Australian Kelpie he has a lot of energy and we never really got into walking him cause we'd just take him to Doggie Daycare, but I really really really wanted to commit to walking him cause it's good for me, great for him, and I really enjoy walking!!

So I got him a new harness, this one to be exact, but the buckle cause some nasty rubbing behind his arm and ended up creating a sore the 2nd time we went out. I knew I had to create something in order to make this harness work...so that's exactly what I did...and yes that blog post is coming soon :)

I ended up getting some fabric and some iron on velcro strips. After I showered this morning I set out to make his "protective sleeve" for his harness and then we headed out for a nice 4.62 mile walk!


I was so happy the strap stayed in place the whole time but extremely disappointed when I took it off and his skin was still irritated. Chuckles is convinced the rubbing just irritated the sore he had so I am giving him time off from that harness until his sore is completely healed up...let's hope by Tuesday he's better cause that's our next scheduled walk!!

Other than that my home made sleeve seems to work. It didn't slide around and Buster walked wonderfully!! We got home and he was pooped!! Fingers are crossed that this is a permanent fix for our problem...if not we will be on the hunt for another harness so if any one has any that might work that...A. Pull from the front and B. Won't cause any wounds to my Buster Roo please let me know!!

Happy Sunday!!
 

A Bit Of This, A Dash Of That Template by Ipietoon Cute Blog Design and Bukit Gambang