September 11, 2012

Thin Mint Smoothie

I hope everyone had a great weekend!! We sure did!!

Friday night was date night for Chuckles and I. We actually spent this date night doing something right up my alley....SHOPPING!! Unfortunately I was not as successful as I was hoping but Chuckles was!! He got a bunch of nice new clothes and some new kicks!! I walked away with a super comfy new robe, some awesome slippers, tights, and scored a killer deal on some cute heels! Woohoo!!


Saturday I got up and completed this killer run!! I set out to only do 8 but ended up doing just over 9...my longest run so far and it felt AMAZING!!


I knew with this run I earned some major Weight Watcher Activity Points meaning I got to indulge in this


Looks kind of gross right?? It's actually quite the opposite!! That my friends is a Thin Mint Smoothie and it's Uhhhhh-mazing!!! Total worth the 9 Weight Watcher Points Plus too!!!

I am never consistent with my smoothie making but apparently now I've got the itching for them!! I believe I've mentioned the awesome blog Peanut Butter Fingers where I've been trying out some of her recipes and enjoying the cute pics of her dog Sadie!! This smoothie recipe came from there!!

You will need a few ingredients that you may not have lying around. I didn't but I think it's totally worth purchasing them:

  • 1 Cup 2% milk
  • 1 1/2 Scoops Chocolate Protein Powder
  • 1 teaspoon Xantham Gum
  • 2 Large Handfuls of Spinach
  • 5 Ice Cubes
  • Peppermint Extract, to taste


Combine all your ingredients in your blender. Be careful with the peppermint extract. If you've never used it before then you are hereby officially warned: a tiny bit goes a long way. Plus you can always add in more later, just go easy on the extract at first!!


Start blending!! :o) Don't you just love our new blender?? Up until now I had been using our food processor to make smoothies and while it did the job I am so in love with this baby!! Having a blender is a must from now on!!


While this looks totally disgusting it actually smelled really good!!


I did run into a slight problem. It was THICK!! I had a hard time getting it into the glass without spilling it all over but I did prevail...


I took one spoonful and I was in heaven!! This little green monster tastes like a mint chocolate cookie in smoothie texture form....does that make sense??


I even had Chuckles try it and he was impressed! You really can't taste the spinach and if you can look past the color I guarantee you will really enjoy it!

Oh and the xantham gum is to help thicken up the smoothie, when I make it again I'll be using a little bit less so that it's drinkable!

Enjoy!!

September 6, 2012

Beer Can Crock Pot Chicken

After the shredded BBQ chicken in the crock pot was such a success I was very anxious to try another crock pot recipe. And that's exactly what I did! I've been wanting to make this beer can crock pot chicken for months and months but would always forget to pull the chicken out or just change my mind!

Finally on Labor Day I decided to make it! I, of course, forgot to pull out chicken but I had to hit up the grocery store that day any ways and decided to cook it on the high setting instead of low. Oh and have I mentioned this is actually a recipe from Pinterest!?!?!? I actually just went through and organized our recipes and tossed a bunch!! I have so many on my Pinterest board why keep cluttering up the recipe book?!!? Why not just wait until I know I like it?!?!? Love Pinterest for helping keep the clutter out of my house!!

I digress...

For this recipe you need:
  • Chicken Breasts (we had 2)
  • Basil
  • Paprika
  • Garlic Powder
  • Salt
  • Pepper
  • Beer of your choosing! (Thanks to my sister in law for leaving some Heinekins behind, I now owe you one (or 4))


Dump all your ingredients into the crock pot. I never measure out my seasonings since it really should be to your liking!


Turn the crock pot on low for 8 hours on on high for 4. Since I didn't get to the grocery store until 10 I turned this baby on around 2 and set it on high!

Your house will start to smell like beer and chicken!


I was not aware that this chicken was just going to fall apart when taking it out of the crock pot. I either missed where she said it or I just didn't think...actually it's probably a bit of both of those scenarios! After realizing this we realized we should've made rice and turned it into a rice & chicken bowl with veggies!


But since we didn't want to wait on making rice we went with the original plans! Voila...beer can chicken, salad, and au gratin potatoes (not pictured sadly).


The chicken was interesting. I can't really decide if I liked it or not. I enjoyed it but not sure we will make it again. Both Chuckles and I could think of at least 5 different ways we prefer preparing chicken so this one probably won't make it into our recipe binder.

It wasn't bad though and I highly recommend you all give it a shot! It's just an interesting mix of flavors that I can't quite figure out if it pleased my taste buds or weirded them out! It kind of felt like I was eating beer instead of drinking it!

The only exception that Chuckles agreed to is if I try it with a seasonal beer. Or perhaps maybe a darker beer with a different flavor. I would love to try it with a seasonal fall beer and make it into a rice and veggie bowl....any suggestions for a different type of beer to try??

September 3, 2012

Quick & Easy!

I have got a super quick and super easy new recipe for you!!! 

Bonus = It's a crock pot recipe so there isn't much work to be done on your part!

I actually got this recipe from Julie @ Peanut Butter Fingers, the same blog I got the Pumpkin Oatmeal Muffin recipe from. Julie calls it her Two Ingredient Crock Pot Chicken, I think we'll call it the easiest meal in the world!!

For this recipe you need:
  • Chicken breasts (depends on how many people you have to feed, we only need 2)
  • 1-3/4 cup reduced sodium or reduced fat chicken broth (adjust if you are feeding more than 2)
  • BBQ Sauce(your own preference)
  • Kaiser Roll (or whichever type of sandwich style roll you enjoy most)
See how you really make the recipe based on your needs and your own personal preferences....so awesome! Everyone gets to be a winner!!

Sadly the kaiser roll is not present.

First things first - place your chicken and broth in the crock pot.


Next - turn the crock pot on low and let cook for 8 hours. I happened to have this going while Alycia and I were scrapbooking...the kitchen smelled pretty darn good!! 

At the 8 hour point remove your chicken from your crock pot and drain the broth. Now, you can decide to do this next part in your crock pot or in a bowl. I will do it in the crock pot next time but since I wasn't really thinking I used a separate bowl.


Shred your chicken breasts!!! For shredding I went old skool....two forks!


Now here's where I sort of changed a step in the recipe.The original version had you placing the above shredded chicken on your roll and then topping with BBQ sauce! That's a great idea for those who prefer a little bit less BBQ sauce. Me personally, the saucier the better!

So I dumped BBQ sauce in the crock pot (still set to Low) and let it cook a little longer, about 30 minutes.

 Doesn't that look so yummy!?!

Now it's time to put together your sandwich...slice your roll in half and place as much shredded chicken as you would like, slap the top half of the roll back on and voila...


These were soooo good!! I am sure at some point in my life I have had shredded chicken out of a crock pot....but it's been a really long time because this was like heaven in my mouth. It was exactly what I was craving and the sauce was saucy! I loved this recipe cause it was so easy and we always have the ingredients on hand. 

To complete this lovely meal I added a handful of Snapea Crisps! I seriously can't get enough of those Snapea Crisps!! 


Coming from someone who used to HATE eating chicken, I will gladly eat this any night of the week!! 
  
Enjoy!

P.S. I've got another crock pot chicken recipe coming your way this week!! Beer Can Crockpot Chicken! Don't worry it's safe for kiddos!

September 1, 2012

Random Questionnaire

Happy Long Weekend!! Ooops I mean Happy Labor Day Weekend!! :-)

I started out the long weekend (just admit it that's what most of us are excited about) on the right note and took Friday off work! Spent the whole day scrapbooking with Alycia and then had a Yahtzee throw down and froyo for date night!

And today we started off our day super lazy and slept in, then hit up Starbucks before planting on our butts in the mancave. But later today we are hittin up the A's game with a small group of cool peeps!! It should be a lot of fun and I can't wait...but since I've got some time pass I am taking it back old skool!! It's survey time people!!!

I've been really trying to blog every other day but since I don't have much to blog about today, no new recipes, no new crafts (well that I can share publicly yet! Working on some small gift items), and haven't finished my book yet, although I am loving it so far YAY!!

So here's a cute picture of Roxy

And one of Buster Roo
That's all the cuteness you will need for today :)

And now one of those damn surveys that everyone loved doing on myspace but that I recently saw on another blog!! Enjoy and have a great long weekend!! And I promise my next post will include more than just cute photos of our "kiddos" and random facts about me!! :-)


BREAKFAST

1. Favorite cereal as a child?

Hmm that's pretty tough since I loved lots of cereals as a kid...probably Cap N' Crunch Peanut Butter

2. Coffee or Tea? With milk or without?

Coffee in the AM, Tea at Night!! :) Coffee with creamer, tea with nothin!

3. The one food you eat most often at breakfast?

Bananas. I eat one almost every single day with breakfast.

Lunch Questions!

1. Sandwiches are generally considered a “lunch food.” If you had to choose between a grilled cheese and a peanut butter and jelly, which would you pick?

PB&J no doubt about it. You just can never go wrong with PB&J.

2. You can only put four ingredients in your salad (not including greens); what do you throw in the mix? Additionally, which greens and dressing do you pick?

Snapea Crisps (instead of croutons), olives, dressing, and ummmmmm cheese.

3. One food you can’t live without at lunch?

That's a toughie I guess I'd have to say applesauce. I love those individual cups of applesauce! They go with almost anything!!

Dinner Questions!

1. It’s the end of the day. You’re tired, hungry, and your fridge is empty. If a fast food (from a chain) is your only option, where do you go and what do you order?

Taco Bell. Mexican Pizza and a Soft Taco. If I'm eating fast food I'm going to Taco Bell, it's the only way I really like!!

2. TV/computer on or off while you’re eating?

TV - usually on since our living room and dining room are one big room, I'd prefer it off.
Computer - off unless I'm home by myself, then I might go on Pinterest or read blogs while I eat.

3. The one food you eat most often at dinner?

Broccoli  or Rice. We usually have both of those and then a variety of meats.

Dessert Questions!
 
Choose between these two American desserts: cheesecake or apple pie?

Chuckle's cheesecake. I love it!

Choose between these two foreign desserts: tiramisu (Italy) or flan (Spain)?

Tiramisu. It's so delish and I can't wait to have some real Italian Tiramisu.

Ice cream: cone or cup?

Cup, it's easier to add toppings when its in a cup :-P

August 28, 2012

The Recipe Club

I am back in the reading groove people and it feels so good!! I wrapped another book this past week and it felt awesome! I hate when I hit a reading lull so when I find myself getting totally engrossed in a new book I am one happy lady!

The book I just finished is called The Recipe Club by  Andrea Israel and Nancy Garfinkel.

The book centers around the friendship of two girls/grown ladies Val and Lilly. The whole book is written in letters and in each letter they write each other (well 90% of them) they include a recipe with of course clever and appropriate recipe names to go with their situation. Cheesy? Yes, but oh so entertaining for a reader.

The book starts out with the women reaching out after many many years have passed since this "thing" that happened and made them not want to talk to each other. Yeah way to start the book out with you wanting to know exactly what happens.....you do find out, but not until the last quarter of the book.

This book was pretty good. I enjoyed it and it was a very easy read. There is nothing HUGE that made my jaw drop while reading it and I can't honestly say that I would really recommend the book to anyone particular. As much as I did enjoy it I'm not sure that I'd recommend it period. 

The book is just a book. Not a memorable one that I would rush to my friends and say you MUST read this. But if you find yourself interested based off the description then go for it. I'd say if you can get it at your local library and save yourself some money.

Overall grade - C. Like I said nothing spectacular but I did enjoy it and I found myself staying up late to find out what the big "thing" was that caused the rift.

August 26, 2012

Wench: A Novel

This month my book club chose to read Wench by Dolen Perkins-Valdez!

The book is something that is completely different from anything we've read and I had heard good reviews from a coworker of mine! It took me about 50 pages before I really got into it!

 The book revolves around a slave named Lizzie that "belongs" to Drayle (his last name). In case you were unaware (like I was) back in the day slave owners would sometimes develop more "personal" relations with their woman slaves. Yes, we've all heard about the slave owners raping their slaves but I was never aware that some would develop relationships with one slave, to the point of moving that slave into their home! I was extremely shocked by this and it took a lot for me to wrap my head around it.

The woman are still treated poorly, don't think that this is a real relationship, but they are treated better than the other slaves. In Lizzie's story she truly believes she loves Drayle, the man who owns her and also has 2 children with her. But it focuses a lot on the summers where her and Drayle would vacation up North (Where slaves were free) and stay at a resort. It was a resort where quite a few white man brought their "special" woman slave and where they stayed in the same cabin together.

Throughout the book you meet 3 other woman and 1 man (all slaves) that Lizzie spends her summers with while at the resort and they all have sad stories to tell! 

The book is pretty gut wrenching and hard to believe, but I assure you it's true. In fact the resort they stayed at during those summers was turned into a school for African Americans and it's been said that those children of the men and their slave woman who stayed there were some of the first to attend the school. 

Overall the book was just plain sad. A book about slavery is already sad enough but then to toss in this very odd arrangement and it's heart breaking. Even though it was sad I still enjoyed it while I read it. I got thoroughly sucked in and finished it in 2 days so it's an easy read as well!!

My grade for this novel - B. It's worth a read if you are at all into the history from that time period!

August 24, 2012

New Couch?!?!

After our wedding Chuckles and I decided we wanted to buy some new living room furniture. Our dogs had basically trashed our couches from laying on them all day while we are at work. We've been sort of actively searching but hadn't found anything that was exactly what I wanted so we were in limbo. 

Then I discovered this Pin on Pinterest and it changed our entire view on purchasing new furniture.

According to the above pin we could easily clean out those nasty stains in our microfiber furniture and have it back to looking fabulous! I want to make sure to make it clear, this trick has only been tried on Microfiber, not any other material so I'd highly recommend doing research before trying this on anything that is not microfiber.

If you do have microfiber furniture and it needs some cleaning like ours desperately needed then get ready for this! All you need is some white (or off white, stay away from colors) sponges, rubbing alcohol, spray bottle, and a bristle brush.

Pour your rubbing alcohol in your spray bottle, do not put anything else in there.

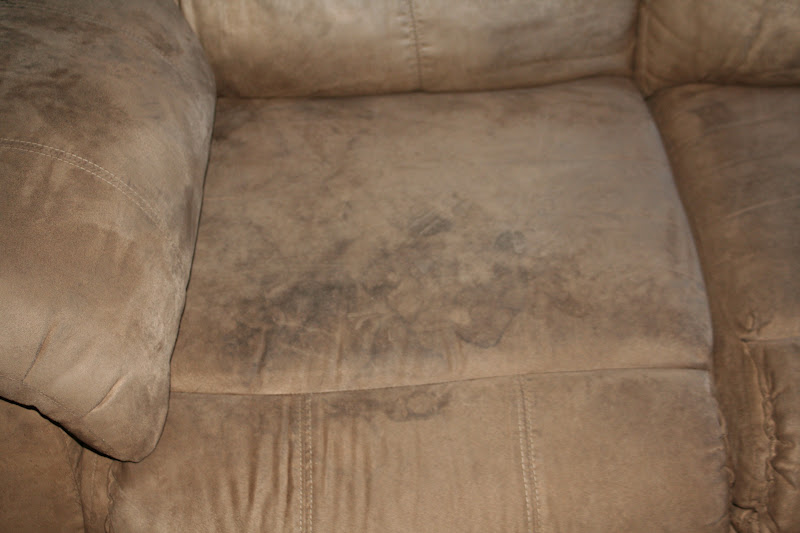
Now don't judge us but here are the before pictures of our loveseat, we've had these for over 4 years now and our dogs have always been allowed to lay on them, plus not crating them means that while we are off at work they are cozied up on this loveseat every day!!

Disgusting, I know!!

Then you saturate the couch with your rubbing alcohol and get to scrubbing with your sponges. I ended up doing this process twice because I didn't scrub hard enough to get out all the nasty marks.

Then you let that couch dry! It will dry fairly quickly but do let it dry all the way.

Once it's dry take your bristle brush and use it on the couch. This will remove the marks from your sponge and make the fabric look like it should.


Doesn't it look so much better already!! Here's a close up of the left couch cushion.

And the right.


I mean seriously how awesome is this trick?!?!? They still need a little bit of work but I ran out of sponges. Yes you heard me right I ran out of white sponges while working on this!! And they are disgusting....wanna see???


Disgusting right??!?!?!?!?!

But remember here is the before:

And after:


One more shot cause I am so impressed by this, this is a close up of the above couch cushion!! 


Consider my mind blown over this one!! We are so excited that we don't have to buy new furniture yet! I'd love to get my big ol' reading chair with ottoman but these couches being only a little over 4 years old are definitely not in need of replacement now!! I just need to get a bunch more white sponges and I'll be working this magic on our couch and then doing another round on our love seat!!

I am so excited!! Thank you so much to 551 East for this awesome trick to saving our furniture!!

August 22, 2012

New Belt - Zero Dollars Spent!

I am learning a lot of new sewing projects from Pinterest and I couldn't be happier about it!

Awhile back I purchased a super cute black dress for work but it desperately needed a belt to go with it to add a little something! I was just going to purchase a bright colored belt but have not been able to find any. While "surfin" Pinterest one day I saw an adorable bow belt and it looked easy enough.

I had some cute polka dot fabric that I used to make a valence for my scrapbook room (oldie but goodie - Valence) and figured what's cuter than a polka dot bow belt?? Plus I used velcro (instead of a button snap) since I already had that, thus not having to spend any money and no need to go shopping. That may sound weird but I am so sick of shopping and spending money. I usually get this feeling at the end of summer cause we tend to always be out and about but add in two weddings and I am spent when it comes to shopping and money spending....over it!!

Since this project cost me zero dollars out of pocket it was perfect!! Unfortunately I didn't take my normal set of pictures, just felt like working through the project and of course regretting it as soon as I finished it!

Even without a how to guide on my blog (you can get instructions for this here.) I wanted to share the cuteness of the belt so that any sewers out there could make one too!!

Here is an up close shot....so cute right?!?!?!?


And excuse my hot mess look, on Sundays I barely make it into the shower let alone do my hair and make up!! 

I love this bow belt and it was sooooo easy!! It was a cute project that took me about an hour and half to complete and is totally worth it! I am definitely going to make some more of these in different fabrics once I feel like shopping again!!

Seriously though....this project is so easy and so cute, definitely give it a shot if you like sewing!!

Thanks Momtastic for a fun Sunday Project!!

August 20, 2012

Banana Saver

Remember my love for bananas?? Well if you also love bananas or if you purchase them for other members of your household then you are fully aware that bananas can turn "bad" real quick. They tend to turn too soft and bruised for my taste after a couple days so I tend to buy smaller bunches of them, but that results in me going to the grocery store multiple times a week. I would much prefer not going to the store for bananas so when I saw this brilliant idea on Pinterest I had to try it!!

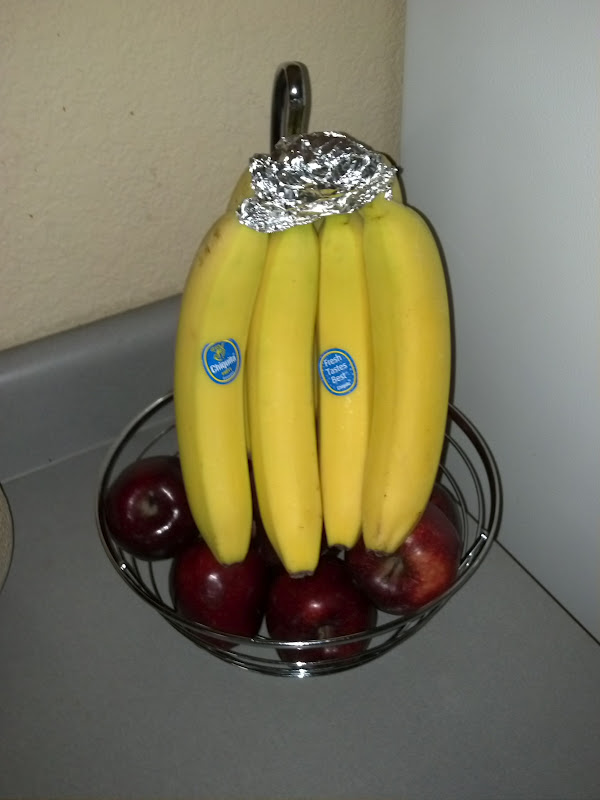
The original idea has you wrapping plastic wrap around the tops of the bananas but we had aluminum foil so I used that instead. I figured it's probably just that the tops need to be covered and not so much about it being plastic wrap or foil.

Day 1 - Notice how pretty they are :)


Day 3 


Day 5


And Day 6 - Holy WOW!!

As you can see I took advantage of the fact that they weren't going bad and saved them! I love having bananas on hand to snack on and now that this little trick works I can have them last a whole week and not have to worry about going to the grocery store!

This trick definitely blew my mind and had it not been for Pinterest who knows if I ever would've discovered it! I've learned that Pinterest is my new best friend!! I was very hesitant about joining Pinterest knowing it would be just another internet time suck for me but so far I couldn't be happier with it. I've completed cute projects, made new delicious recipes, and now of course picked up a few tips and tricks here and there that are STELLAR!!

If you haven't joined Pinterest yet you MUST! Even if it's just for the helpful house tips, it will be worth joining!!

August 18, 2012

Cookies From Miranda Lambert's Kitchen!

Recently I was catching up on my magazine addiction and came across a section from Taste of Home that was all about Miranda Lambert!! I grew up listening to country music and still listen to it and Miranda Lambert happens to be a female country singer I can stand behind! I love her "don't take shit" attitude and her happy love story with husband Blake Shelton (for those who don't know he's also a country singer).

But in this article was broken into 10 Random "Things" About Miranda Lambert and number 6 was a recipe for cookies called "Magic". Of course I wanted to try them, just look at the ingredients:

  • 1 Cup Crunchy Peanut Butter
  • 1 Cup White Sugar
  • 1 Egg
  • 1 Teaspoon of Vanilla Extract.

Look at that peanut butter!!!!!!!!!! YUM!!!!!!!!!!!!!!!


Combine all your ingredients in one bowl.


Mix well.


Roll the dough into golf ball sized balls, or a little smaller. I did them just a bit smaller. Then using a fork create criss-cross marks. Yup, just like peanut butter cookies...coincidence perhaps?


Throw those babies into the oven at 350 degrees for about 10 minutes. And then head to the kitchen to wash up all those dishes you used! At this point this was by far the best part of these cookies. Seriously only used a handful of dishes and only one bowl - that's a keeper of a recipe!


And voila after 10 minutes not only will all your dishes be clean but you will have these amazing cookies ready to be consumed. No I do not wait for cookies to cool completely before I taste them...how could you?


One of the biggest plus' to this recipe is that it doesn't make a huge batch, just enough to satsify the sweet tooth and if you have guests over you probably won't have any leftover!! YAY!!

These cookies are super delish, but they taste exactly like regular Peanut Butter Cookies. I get why Miranda Lambert and family call them Magic! With less ingredients to mix and dishes to do it is magical that these turn out so well and are soooo easy!!

I highly recommend (obviously who wouldn't want to eat a yummy peanut butter cookie) and I definitely hope that if I'm ever invited as a guest to Miranda Lambert's home (yes I have high hopes) I will get to enjoy these delish little cookies!!
 

A Bit Of This, A Dash Of That Template by Ipietoon Cute Blog Design and Bukit Gambang