August 12, 2012

Biggest Loser Oatmeal Pancakes

Another pancake recipe for you all!! I've been on a kick lately with trying to find the BEST pancake recipe and I'm pretty sure I found it with the Greek Yogurt Pancakes, but I still had another recipe to try!

This one I wanted to try because it is the Biggest Loser's Oatmeal Pancake recipe! Another awesome Pinterest Find!!

These called for a few different ingredients (I cut the original recipe in half)
  • 3 Egg Whites
  • 1/2 Cup Oats (Dry)
  • 1/2 Cup Cottage Cheese
  • 1 Teaspoon Sugar
  • 1/2 Teaspoon Cinnamon
  • 1/2 Teaspoon Vanilla Extract


Combine all your ingredients in a blender or food processor.

Blend or Processor for a few minutes until you get a smoothish batter, it will be lumpy because of the oats, but that's okay!


Spray a pan with nonstick spray and heat up. Then make 2 (or as many as you want) pancakes.


I had a hard time with these style pancakes because I am never positive on when to flip! I made pancakes similar to these (Sorry no blog post on those) and burned the crap out of them the first go around. Now I'm a little hesitant but luckily these turned out on the first flip!


After they are cooked to your liking, I prefer mine browned over burnt, and smother with topping! I went with my usual peanut butter and light syrup!


These were pretty delish! The texture is pretty different from regular pancakes due to the cottage cheese and the oatmeal but I definitely dug into them!

However, the Greek Yogurt Pancakes still win! While I will still make these just to switch things up, and I truly did enjoy them, I am so in love with the Greek Yogurt Pancakes!

I dare any of you to make them both and then tell me you like these better than the Greek Yogurt Ones!! I double dog dare you!! :) I hope someone accepts my challenge!! (Anyone?)

August 10, 2012

Workout Calendar Results!

Well folks I've got one month down using a workout calendar, along with earning some extra cash!!

And I know the picture is probably super hard to make out but that's cause I scribbled all over it!!!!! Every time I worked out I would write down my mileage, time, a check mark, and a $!! If I didn't work out (a.k.a missed a scheduled workout) I put a giant red X and then took off $1 for each one I "missed".

.

Overall results were:
  • 6 Missed Workouts
  • 31 Completed Workouts!
  • 17.52 Hours of Excercise!
  • 49.06 Miles Ran!
  • 29.25 Miles Walked!
  •  173 Weight Watcher Activity Points (Week 1 = 49, Week 2 = 47, Week 3 = 51, Week 4 = 26)
  • $25 in the Workout Jar!
I achieved my goals for the month of July!!!

I am very proud of all my workouts! I am not happy about skipping out on 6 workouts but this month was all about trial and error. Being how I wanted to really push myself and see how much I could do I feel like July was a success!! 

I loved it the first 4 weeks and then my body hit a wall! I definitely hit the "too much" zone and realized I needed to give myself a few more rest days in August! Plus I figured just because it's not on the calendar doesn't mean I can't still do something if I'm feeling up to it! 

Overall I am so happy with my workouts from July and feel so much more confident starting out August (yes I know it's August 10th but I assure you I'm on track and the calendar is on the fridge)

So here it is folks my August workout schedule!! Looks extremely doable with a few extra days that I can add in some fun excercise if I want to!!

 Yup, another wedding picture!!

Here's a close up of my schedule!!

I took the rest of the first week as a rest week. It was a bad week altogether and my head was not in the game, my body was tired and I just needed a break. But I am back at it and haven't missed one workout this week! In case you are wondering....those work outs in yellow are my optional. I discovered that some mornings I don't have the time to do that and it takes me about 20 minutes so now I'm using August to figure out if optional will work for me or not. 

So far this week I'm 0/2 but I'm confident next week I'll get back to them! I can't do it on my run days cause it's actually a lot of leg work and I don't want to completely kill my legs!

But this schedule still gives me my 3 run days and 2 days dedicated to walking Buster. I feel like most Sundays I'll want to take him any ways but I am trying out this schedule to see if those rest days help!! 

And here are my goals for this month! I am super excited about my goals!!


And since that picture is somewhat dark (my apologies) here they are:

  • Run 55 miles
  • Walk 35 miles
  • Run my 5K in 30 minutes or less (yes I achieved this goal last month but this time I have a real race)
  • 2 Full Body Workouts Per Week!! (already screwed that one up this week, but I'm going to try and fit one in Saturday AM)
And there you have it folks! So far this has been awesome! I'm motivated every time I walk into our kitchen. I think having this front and center has helped a lot and of course inspired me to want to put more inspirational items on the fridge like quotes!!

August 8, 2012

DIY Car Garbage Sack!

This past weekend I got to spend a lot of quality time being crafty in my scrapbook room! While that was not the original plan for the weekend I was extremely excited to get in there and have some fun! And thanks to Pinterest I was able to pull off a project to do within 5 minutes!

I had found this awesome little Travel Trash Bag on Pinterest and knew immediately it would help keep my car cleaner longer! Am I messy person? No, but during the summer months we take my car everywhere and it ends up pretty darn dirty! I recently cleaned it and am now being super anal about no food, no scraps of paper, no drinks come in that do not leave within the same trip...yeah it's pretty bad but she just looks so pretty!!

Enter this amazing little project that will only aid my attempts at keeping my car spic and span!!

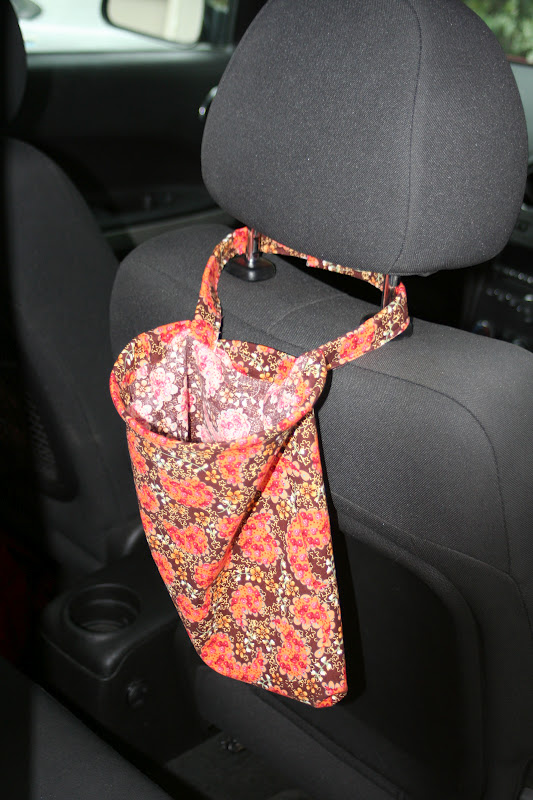
Hello Super Cute Travel Trash Bag

I will give you the brief commentary on how to complete this project, accompanied by a million pictures, but I would highly recommend you check out the originators blog post about how to complete this trash bag!

Thanks Nancy's Couture for a fun and easy project!

Thankfully I had all the supplies to work on this project cause this woman was not leaving her house unless absolutely necessary!

You will need:
  • 1/2 yard of fabric
  • Interfacing
  • Boning
  • Scissors
  • Velcro
  • Thread
  • Sewing Maching

I actually had purchased a bunch of this fabric a couple years ago in hopes of making my own grocery tote bags, nope they still haven't been made, but I do have them on my ever growing To Do list!

I started out by ironing out my fabric to make it easier for cutting.


You will need to cut a rectangle of fabric measuring 20" x 15", 2 fabric rectangles measuring 2" x 11", and 2 pieces of interfacing measuring 2" x 11".


Once those are cut out you will want to attach your interfacing to the wrong side of your fabric rectangle strips. Read the directions on how to attach your interfacing. Mine was easy, you just use an iron, but what this crafter didn't realize when I originally purchased the interfacing is that it was double sided adhesive. To sum up I had to be very carefully when attaching my interfacing so it only stuck to one side of fabric and not my ironing board as well.

It worked out well!

Next up you will fold each on of those rectangles in half using the "hot dog" method :) And pin in place!


Then get to sewing the open ends up, but do leave one end open (either top or bottom).


And voila, you have yourself a set of straps!


The next step calls for you to start working on the actual bag. Take your bigger rectangular piece of fabric and fold it in half, with the wrong side of the fabric facing out.


Sew the open ends shut.


This part got a little tricky for me and I ended up opening up her blog on my lap top! For some reason I was just nervous this part wasn't going to work right and I had a hard time. I also "altered" one part of her directions, basically because I was confused.

She has you to do two folds, first you fold the top over 1/4" and iron, then fold another 3/4" and iron again. I ended up just folding it over 1" and then ironing. After you are all done ironing you slide the unsewn part of your straps underneath your fold and pin. Then sew the top part, leaving enough "empty space" for to insert your boning. Important do not sew all the way, I left an inch opening in the fabric to insert my boning.


See how an inexperienced sewer may have gotten slightly confused? I'm sure it's just me that's confused and nothing to do with the original bloggers instructions but I still was slightly stumped!

After you've sewn the top part (leaving an inch unsewn) you can insert in your boning. Cut a 15" piece of boning.

The boning I got (and maybe it's all boning I'm not sure) had a cloth covering so I removed that and then just inserted the hard part of the boning into my bag.


Once your boning is in (you want the two ends of the boning to end at each strap) go ahead and sew up that 1" piece you left open.


The next part is another alteration (pun intended) I made to the original instructions. My straps were kind of funky when I flipped the bag right side out. It just looked a little funny to me so I  ended up sewing them in place. This is going to be hard to describe so bare with me - I "folded" the straps over so that I could get an idea of how it was going to sit in my car and then seemed to be a little "unsteady". I just added an extra set of stitching to help hold them in the place I wanted them to be. I know totally confusing, I am sorry about that, but you can probably skip this alteration altogether!


Next up you attach your velcro to your straps! I had iron on velcro (Yippee) so this was done within 5 minutes for! For those of you who don't have iron on velcro you can either A. Just sew on your velcro or B. Go get iron on velcro! I love it! Make sure to put the pieces on the correct side of each strap so the two connect perfectly!


And that's it folks!! Your travel trash bag is complete and ready to be hung in your car!

Oh yes you better believe that within 10 minutes of finishing this project I was headed out to my car and ready to even start using it! Alas, I had no garbage to put in it but it still looks AWESOME!!

I am so stoked with this project and so pleased with the ease I had in putting it together. Sure I had a few moments where I struggled but nothing that wasn't easy to manage! It was such a fun project to make and I am sooooo happy I found it on Pinterest!!

So thanks again to Nancy's Couture for their awesome project ending up on Pinterest!! It provided me with a great afternoon!!

August 7, 2012

The American Heiress

My Apologies Readers. I have been stuck in a reading rut but I have finally pulled through. For some reason I was very disinterested in reading in July and due to personal reasons I did not even attend our monthly book club meeting. I did however finish reading the book at last and feel that I am ready to get my reading back on :)

I finally finished reading The American Heiress by Daisy Goodwin!
I was so looking forward to reading this book when our book club first selected it and even more so after I started reading it. But then summer weather really hit and I did not feel like spending any time reading, especially a book that for the most part takes place in dreary England.
The book focuses on Miss Cora Cash, an extremely wealthy heiress in America who (because of her Mother) goes in search of finding a Duke to marry. The book focuses on Cora's transformation from a young at heart, carefree American Heiress to an esteemed Duchess with child! 
The book is overall quite interesting and the details are amazing. I felt at times I must be in England and attending these over the top parties! I was completely enthralled in the book and couldn't wait until the end. This book was definitely a book that had to guessing as to what the secret was, you know before they reveal it in the book, but I was constantly thinking "there must be more to it". Not hardly, the book ends exactly how you think it will end and that my friends is without a big hurrah. 
Life moves on for Cora as you'd expect and I was left with a "that's it!" feeling. I mean who wouldn't love some major drama after a scandal is revealed? Apparently not the author, she stayed true to the "real world" which for me was far less sastifying!
Overall Grade is a C+. If it hadn't been for the ending I probably would've given the book an A-. If you are interested in this particular time period & location by all means enjoy, the writing is wonderful, but if you are not then I'd steer clear!
Happy Reading!

August 6, 2012

Greek Yogurt Pancakes

This weekend I made an amazing recipe that turned out to be low in Weight Watcher points! To say that I was excited would be an understatement! I was thrilled!! In fact these pancakes are even better than regular old pancakes, yup I'm going there!!

In fact even the originator of the recipe (well where I found it) called these the "holy grail of pancake recipes"...oh yes they are that good!! 

These are super simple to make too! All you need is:
  • 6 oz Greek Yogurt
  • 1 Egg
  • Scant 1/2 Cup Flour
  • 1 Tsp Baking Soda

 To start you want to take your 6 ounces of Greek Yogurt and put into a small bowl (or a large glass measuring cup like me) and stir until the yogurt is nice and smooth. Add in your egg and continue to smooth until it's smooth and a yellowish coloring.


In a separate bowl combine your flour and baking soda.


Then it's time to mix the two together.


Surprisingly it turns out looking like this! Definitely a weirdish texture and yes it made me nervous!


Then heat up a pan and spray with non stick baking spray. And place some of the batter onto the pan. I divided my batter into 4 pancakes, you could definitely go smaller but since it was just me eating them I decided to do 4!
 

The timing on this is quite tricky, or at least it was for me! I wasn't sure when to flip and ended up losing some batter on the first go round, but all in all they were cooking up very nicely!


Once they are cooked all the way through remove from heat and place on a plate! Don't they look good? I was still skeptical at this point because honestly that batter was just kind of odd looking to me! I thought I did something wrong!


Top with whatever toppings you'd like. For me it was good ol' peanut butter and low fat syrup!! And yes I did taste them before I smothered in toppings!


Despite the unusual looking batter these were AMAZING!! These were so delish that I doubt I'll be making regular pancakes again! They turned out to be the perfect texture and soooo filling!!


I couldn't even finish both of these babies as they were really filling!! I can see eating these after a long run for sure! Pancake Lovers you MUST make these!! So simple and so good!!! The next time I make these I might even add in some cinnamon to the batter and then top with just syrup!! I cannot wait for next weekend as I already know these will be on the menu!!

If you make 4 pancakes out of this mix then it's 3 weight watcher points per pancake, if you make 8 smaller pancakes its only 1 weight watcher point per pancake.

The original recipe can be found here.

August 3, 2012

Pumpkin Oatmeal Muffins with Chocolate Chips

I recently discovered a new blog (via Pinterest - go figure) called Peanut Butter Fingers and it's a healthy living blog! The author of the blog (Julie) is such a likeable gal and I highly recommend you go check it out!! She posts three times a day and covers so many different topics that pertain to her life & healthy living!!

On this blog I discovered her Recipes section!! Oh yes you had to know I was going to go straight for the recipe portion!! I quickly learned to make Cold Overnight Oats (still lovin by the way) and now these super delish Pumpkin Oatmeal Muffins!! Seriously these are going to be a Fall Favorite in this house!!

And we had all the ingredients on hand = BONUS!!
  • 3/4 cup whole wheat flour
  • 3/4 cup all-purpose flour
  • 1 teaspoon baking soda
  • 1/2 teaspoon baking powder
  • 1 teaspoon cinnamon
  • 1 teaspoon pumpkin pie spice
  • 1 cup old fashioned oats
  • 1/3 cup brown sugar
  • 1/2 cup sugar
  • 1 egg
  • 1 cup canned pumpkin
  • 3/4 cup milk
  • 1/3 cup canola oil
  • Optional mix-ins: nuts, chocolate chips, butterscotch chips, raisins


Combine your two flours and your sugar, then set aside.


Next up it's PUMPKIN time!! I was so excited and so happy to open up a can of pumpkin!! I really really miss fall foods and I am definitely that person who will make things with Pumpkin year round, but it's been a long time!

I definitely took a few minutes to enjoy the scent of this pumpkin!!


Then combine your pumpkin, egg, milk and canola oil.


And I'm sure this was supposed to be in the first step but if you haven't already add your baking soda, baking powder, cinnamon, pumpkin pie spice, and oats to your flour mixture.


Then mix your dry ingredients with your wet ingredients!

Looking delish!!


And now would be when you'd add in your optional items! Since we had Milk Chocolate Chips on hand I felt we needed to add them :)


Then grease up your muffin pan or insert cupcake papers and start filling. The recipe makes twelve muffins so decide your batter evenly! They will be nice and full! Bake at 400 degrees for 18-20 minutes, this will really depend on your oven!


As always wait for your house to fill up with those delicious fall scents!!


And dig right in!!


These muffins are so amazingly delicious!! They were a huge hit with Chuckles too so I know I'll be making them during fall season!! They are a little high in Weight Watcher points (with the chocolate chips 7 points a muffin, without only 5 points) but if they are a weekend treat I think it's okay :)

I highly recommend these muffins and I cannot wait for Fall to get here so I can make them again! I see a nice Pumpkin Spice Latte, with one of these muffins and a good book in my future :)

Don't forget to check out Julie's blog - Peanut Butter Fingers.

July 31, 2012

Photography Challenge - Day 31 - Extra!

You didn't really think I'd leave you with that last photo did you?? Nope, not a chance!! Because I chose a month with 31 days and there were only 30 challenges I decided to make Day 31 a free for all!! I wanted to share with you all some of my favorite photos from my small collection!

These roses were a surprise one day from my Chuckles!! They were truly gorgeous and they were just because flowers - my favorite!!


The sky and the yellow field of flowers are just stunning in this photo! This is by far one of my top favorite scenic shots!! The lighting was perfect, the evening was perfect, and after getting this shot I got to head off to book club!! It was a great evening!!


My Belle! She is just so darn pretty (yes I'm biased) and I actually entered this photo into our local fairs this year. The first fair it got a ribbon and we are headed out Friday night to see how it placed in the second fair!


Talk about perfect lighting! One Friday I worked later than normal (6:30ish) because I wanted to catch some shots of sunset at the Round Barn by my work! I love this picture so much! It again was lucky timing on the sun setting and of course using the bokeh setting on my fancy camera!


Hawaii Shot!! This beautiful flower was found at the Honolulu Zoo on our Honeymoon and another entry into both fairs! This one also got a ribbon at the first fair, so lets hope it places again!!


I love love love love love love this shot. Between the golden yellow flowers with a sprinkling purple in there and the horses in the background with the green grass and tress = perfection! I couldn't have been happier with this shot! It was one of those days my Paps and I went out to just take pictures and as we were about to pull away we spotted the horses. Naturally we put the truck in park, got out, and spent the next 10 minutes shooting these beauties! 


This one happens to be one of Chuck's favorite photos! It's probably hard to tell but it's a scenic shot of a beautiful valley and vineyards! This one picture captures so much of where I live that it's a keeper! Chuck even wants to blow it up and put it in our bedroom to replace the "gloomier" shot that I love! Maybe I'll surprise him and get that done this weekend!


This shot is by far one of the coolest building shots I've ever taken! This was taken in San Francisco when Chuck took me their for my birthday! We spent the whole day sightseeing before a surprise party that night, so not only do I love the shot but I will always have the best birthday memories from that day! I did change the photo to be a black and white because I wanted the focus to be on the building and not the beautiful blue skies from that day!


This photo is where I can show off those blue skies! This was the same day and we were so excited to take the boat tour around the bay! We went under the Golden Gate Bridge, which every one who visits the city must do! It's absolutely amazing to be underneath the Golden Gate Bridge and you can get some great shots!!


This used to be our only living flower! It's dead right now, but I am confident it will come back to life during the fall and winter! I love these flowers and this picture was taken right after it had rained. Some of my favorite shots are ones of water or dew sitting on flowers, grass leaves, or tree leaves. I think they are so simple but so beautiful!!


I've never been a great still life photographer so I've been practicing! Apparently practice can make close to perfect :) This was taken with my little digital point and click camera so imagine how happy I was when it turned out so well! This is another I entered into the fairs! The first fair it didn't place but I re-cropped it and centered it better in the frame in hopes of placing in the second fair! In the original form (and my frame) the bottom of the glass was cut off which basically ruins the whole scene. Wish me luck I get a ribbon on this one!!


Another great shot! This one was taken at some local railroad tracks and is actually hanging in our house! Something about the angle and the bokeh (yes I love that setting) just made me fall in love with this picture! Simple yet classic!

 And last but not least, actually these are in no particular order, I present you with this precious one! Those little acorn casings (I think those are acorns) were so adorable and sitting on the stone wall just like that. I swear I didn't move them one bit! They reminded me so much of Elephant Trunks, well the "nostril" part and they were just so cute! I love the stone wall, love the nut casings, and love that a part of the green grass shows up and breaks up the photo a bit!


And that folks is the end of my photography challenge! It has been challenging, fun and worth every minute! I've really enjoyed myself this past month, blogging on a daily basis, and getting to have fun with my phone camera, point & click camera, and my fancy schmancy camera! I will more than likely do another challenge during the holiday months or perhaps I'll just take some awesome shots to share with you all!

If any one else does a challenge like this please let me know! My best friend Alycia did this challenge and I loved seeing her posts every day!! It's always a pleasure to see other peoples work! :)
 

A Bit Of This, A Dash Of That Template by Ipietoon Cute Blog Design and Bukit Gambang